Welcome, Sit down, and make yourself comfortable.
RomanDA's DX Tutorial Series
Published on April 26, 2006 By RomanDA In DesktopX Tutorials

RomanDA's DesktopX Tutorials:
My goal is to make a set of tutorials for DesktopX.  If you have ideas on what you would like to see, please email me at DXTutorials@RomanDA.org

MouseOver DX Controls:
  How to use a transparent area and mouseover to show/hide items.
This could easily be modified to use for a DROP DOWN, or SLIDE OUT menu system.

Click HERE to download the working widget first!

Master Background Transparent Background Item Frame
MasterBack transparentback Area1,2,3,4

The trick to using these is in the ADVANCED properties in DX!
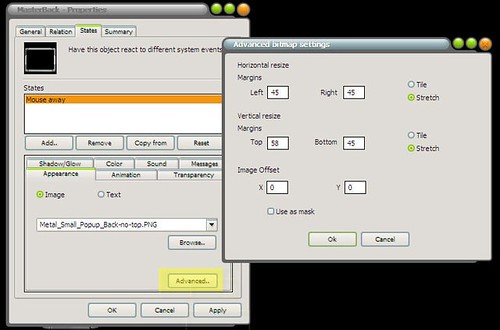
By using these setting you are able to "stretch out" the Background and still keep its shape and look.
The Left/Right/Top/Bottom are in PIXELS.  You have to know the position of things in your images to be able to use the correctly.

I used the same ADVANCED settings to take the very small Item Frame and make it into the bars you see in the working widget.
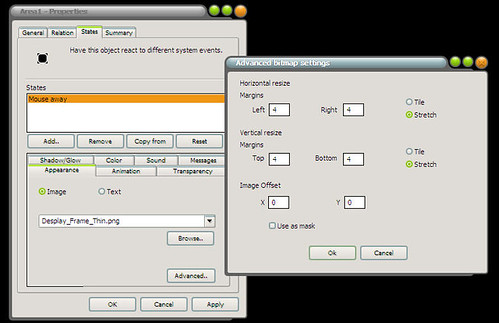
This is a great part of DX, it allows you to have a REALLY small png file and use it to make just about any sized bar.

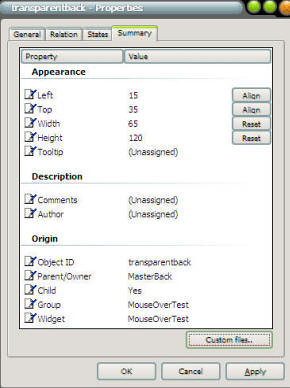
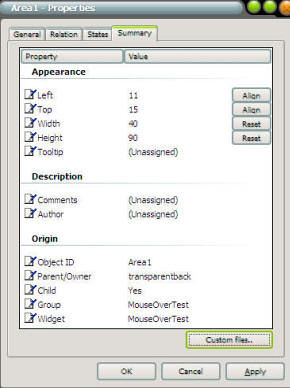
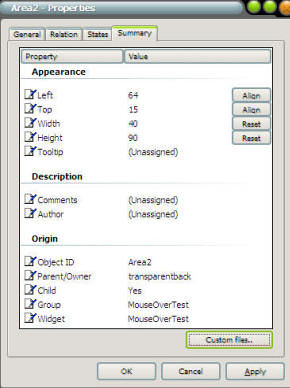
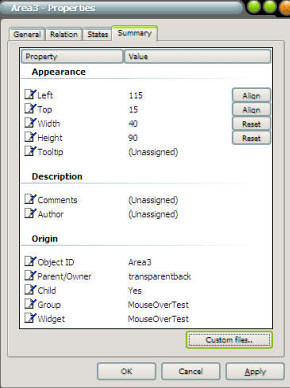
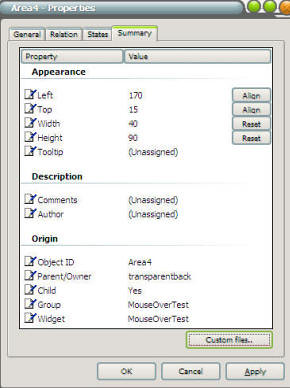
Use these setting below to work out the height/width/top/left/and parent/child relationships:
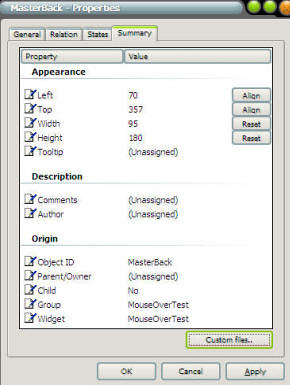
MasterBack transparentback area1
area2 area3 area4
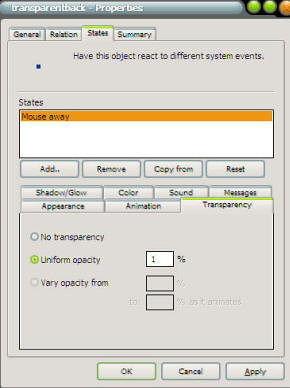
You need to change the Transparency on
transparentback item.

This makes this item nearly invisible.

DO NOT EVER SET IT TO 0 for the opacity!!

I have had DX BLOW UP on me simply by setting this to 0.
This will be the "container" for the AREA(1,2,3,4) items.
<----------


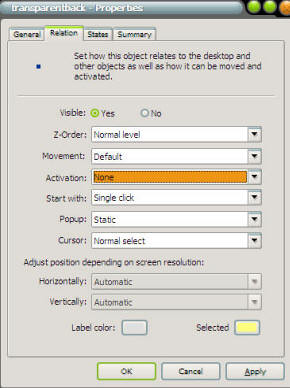
In the properties of the transparentback as well as
all of the areas you need to change the "activation"
to "NONE" this makes the mouse ignore these areas.

This would need to be a little different if you are wanting
the areas to be "buttons" in a menu system.
BUTT, if your doing that setup, you should use a
mouse over, i would make a btn you CLICK to show
the menu then click to Hide it!  ----------------------->

So now you have all the parts.  and hopefully you have them all put together right.

The way this works is as follows:

  • The AREAS(1/2/3/4) reside on top of the transparentback object.
  • transparentback object resides on top of the MasterBack object.
  • The Script we will create will make the transparentback's width/height match the MasterBack (- a little to make it reside INSIDE)
 
STEP 2: Let's look at the scripts:
  Ok, now that we have the objects made, lets play with some scripts.
The only object that has a script is MasterBack.

Click the PROPERTIES of MasterBack then click on ""NEW" for the script.

 
Dim MinW,MaxW
MinW = 100
MaxW = 250

Sub Object_OnScriptEnter
     object.width = MinW
     desktopx.Object("transparentback").top = 35
     desktopx.Object("transparentback").left = 15
     desktopx.Object("transparentback").width = object.width-30
     desktopx.Object("transparentback").height = object.height-60
End Sub

The above script is designed to set the default size of the MasterBack to its Min Size.
You could easily change the MinW (minimum width) and MaxW (maximum width) to be whatever settings you want.
It also sets the top/left/height/width of the transparentback object to match the size of the MasterBack object.

Sub Object_OnMouseEnter
    Call Grow
End Sub

Sub Object_OnMouseLeave
    Call Shrink
End Sub

The above scripts are to handle the mouse over/leave states.
I have them call sub functions so i could keep track of what it was doing.  It could easily be changed to work without these sub functions.

Function Shrink
    object.KillTimer 200
    object.SetTimer 100,10
End Function

Function Grow
     object.KillTimer 100
     object.SetTimer 200,10
End Function

These functions start and stop the "grow" and "shrink" function of the widget.
You can make it grow/shrink faster or slower by changing the ,10 in the SETTIMER function.
The 10 is 10 ms.  If you want it to be slower make it 20 or 30, faster would be 5, 2.

Sub object_ontimer100
     If object.width => MinW Then
          object.width = object.width - 5
          desktopx.Object("transparentback").width = object.width-30
     Else
          object.KillTimer 100
     End If
End Sub

Sub object_ontimer200
     If object.width <= MaxW Then
          object.width = object.width + 5
          desktopx.Object("transparentback").width = object.width-30
     Else
          object.KillTimer 200
     End If
End Sub

These are really pretty simple "grow" and "shrink" functions.
object_ontimer100 Shrinks the MasterBack width down by 5 pixels at a time until it reaches the MinW value.
It also changes the transparentback object's width as well.
By making the transparentback shrink at a smaller size than the MasterBack it looks like the AREA(1/2/3/4) objects are being hidden.

object_ontimer200 does the same thing only in reverse.  It makes the object GROW at 5 pixels at a time until it hits the MaxW value.

Once they reach their set values, they KILL the timer so it stops trying to shrink or grow.
I also added this code in the shrink/grow functions to be sure it doesn't get stuck in a loop.

 
In Conclusion
  This is a really simple way to have a container that shows and hides objects placed inside it.  I have used this for my GalCiv II Drive Meter widget.

I know this seems simple, but it took me a while to figure this out.  I hope by posting this article and the widget that I can help other people who are attempting to learn DX.  The potential for DX is amazing.

Please let me know if you have problems, comments, or questions with this.

 
Enjoy,
RomanDA
AKA: David A. Roman
http://romanda.wincustomize.com
http://www.romanda.org
DXTutorials@RomanDA.org

Comments (Page 1)
2 Pages1 2 
on Apr 30, 2006
Anyone use this? got ANY comments? or was it a waste of time?
on Apr 30, 2006
I plan to use it and I am amazed there are not more comments. This is great and the effort put into it is apreciated.
on Apr 30, 2006
Great tutorial RomanDA Thanks for sharing, I must have missed this till now. cheers man
on May 01, 2006
It's a good tutorial. I'll be using it later.

Posted via WinCustomize Browser/Stardock Central
on May 03, 2006
Wow! Just found this...need to reset my watch-list or something!
Roman, your GCII stuff rocks. I can't seem to get my Sysmetrix to recognize there's a net in and net out, so I use your meter to display that.[the sysmetrix thing is about my homebuilt white-box rig...works fine on my laptop]
I've used DX since 2002, got mad and didn't like it at all...now it's the cat's meow[oops! sorry, Po']
Having an in-depth tutorial like this is incredible. Major thanks for taking the time and effort to put it out here.
on May 29, 2006


[bookmarked]
on Jun 01, 2006
Hello again, RomanDA!

I would just like to say that my widget seemed impossible until RomanDA told me about this technique. Now it works great and does everything I want it to do! I'm sure I'll be using this technique on more widgets to come. So, a big thanks to RomanDA for getting this newbie started. Excellent work!

on Jun 12, 2006
Hey great tutorial!
I come from a web design/programming background. Specifically with flash and php. Alot of the principals in DX ring true , albeit with different syntax.

Now this may seem like an odd question, but why would one use the object timer / kill timer for what is essentially a true/false situation ? would it not make more sense to have a variable that is set to true or false?

I am interested in developing widgets and object, but am put off by the lack of tutorials for writing scripts for practical application - such as this.
It seems desktopX is great if you want to write weather/clock/dx player widgets and drive meters... I mean, point me to a dx player with a properly working playlist editor!!

I digress. Thanks for some of the best tutorials out there - kudos.
on Jun 12, 2006
Now this may seem like an odd question, but why would one use the object timer / kill timer for what is essentially a true/false situation ? would it not make more sense to have a variable that is set to true or false?


It's not a true/false its a start/stop actually.

The timer does things over and over until killed.
The way this works is to SLOWLY fade out the objects, a little at a time.
Think of it as a WHILE loop. But timed, so it takes a few seconds to fade out/in.

Hope that helps.

I am interested in developing widgets and object, but am put off by the lack of tutorials for writing scripts for practical application - such as this.
It seems desktopX is great if you want to write weather/clock/dx player widgets and drive meters... I mean, point me to a dx player with a properly working playlist editor!!


I agree to the lack of tutorials, that was my main reason for writing these. DX has some AMAZING potential, its knowing how to make it do the things we want it to do that's hard. I wish some of the more advanced DX scripters would write a few in simple to follow steps (like i attempted to do here).

Look at my SportStrip Program, it really does a heck of a lot for basically an RSS reader.
Link

There are a TON of things that can be done in DX that no one has come up with yet.
Look over Link these, Vadm is AMAZING, the things he can do with DX is beyond belief. He makes me want to give up, or work so hard to make the best stuff around (ok, not that one).

DX is like Visual Basic but with a very modifiable and skinable front end!!
There really isn't any limit to what can be done with DX.

Have fun with it!!
on Jun 12, 2006
Let me clarify my true false comment:

Going over one of the VERY simple tutorials in dx for the growing rock, i was suprised at the following:


ulSize=ulSize + 1
If ulSize>200 Then ulSize = 50
Object.Width = ulSize
Object.Height = ulSize
End Sub


And that struck me as being a tad limited.
In the quest for knowledge i decided i would make the rock grow and shrink continually
My solution was to use a variable that i set at the start called rockGrow.

Dim ulSize, rockGrow

rockGrow = True

'Called when the script is executed
Sub Object_OnScriptEnter
object.SetTimer 1,75
End Sub

Sub Object_Ontimer1

If rockGrow = True Then ulSize=ulSize + 1
If rockGrow = False Then ulSize=ulSize - 5

If ulSize>200 Then rockGrow = False
If ulSize<50 Then rockGrow = True

Object.Width = ulSize
Object.Height = ulSize
End Sub


'Called when the script is terminated
Sub Object_OnScriptExit

End Sub

While this is still a rather bad example, its the only one i have off the top of my head.
My point is that you can read a true/false the same way as you do a start/stop.
The only difference to me here is that you are using a conditional statement to gather a true/false (from the object width / max width)

Then you could even use accelleration/decelleration for the fades/stretches with seperate functions like fadeUp and Fade down, and incorporate mouse events to trigger these... i think?
Or is it that the timer controls the frequency in which the script is executed? if this was the case, then it's similar ro using a frame loop in actionscript to determine how often to run a function

These are more questions than statements really - think of it as an incomplete thought pattern thats coming out of me brain. I am also attempting to ask a few questions which would seem to be useful for anyone trying to get to grips with the syntax.

Your tutorials were the reason i decided to splash out the money for the software - you should get some commission! (snd thank you for the lightning fast reply)


Posted via WinCustomize Browser/Stardock CentralEdit - disregard the majority of that post. i re-read and the penny dropped on a couple of things. Seems i "missed" a code block. whoops.


anyhow, when i figure out how to read directory contents on a computer - watch out for a widget.
on Jun 12, 2006
well...

first thing, i use the width to get the current state of the object. So i dont need to store any other var's anywhere, as the width is what im trying to change in that part.

second, the timer is a timer, so it has a time var, ie:

object.SetTimer 100,10 where the 10 is in mil-seconds. if you want it faster make it 5, slower is 20, etc..

Make sense?

----------------------
Im not saying that this is THE way, or the only way, its just 1 way to do things.

Your tutorials were the reason i decided to splash out the money for the software - you should get some commission! (snd thank you for the lightning fast reply)


Works for me, now send that to brad at startdock.. lol

Good luck with DX, get into the IRC chatroom (#Stardock), im around in there a lot.
on Jun 13, 2006
As a follow up, i found 2 little quirks with the tutorial. It was amplified when i used my own images with a different offset and changing the speeds.I hope i can explain this easily...

The First problem is that the "<=" and ">=" for the tutorial actually make the box grow and shrink one time too many. If it is equal to the max or the min it takes off another 5px... So you remove the "equal to" and you fix the problem..
However, changing these to correct the tutorial leads to a bigger problem...

This assumes i have changed the script as above to get the sliding exact.

The second problem deals with the differential between the min and the max
For example, if i had a min width of 100 and a max width of 250 (like the tutorial), the differential is 150. 150 is divisible by 5 pixels (the distance the box shrinks and grows in the tutorial) with no remainder.
In this case i decided to speed up the shrinking and growing.
With a faster shrink of 20pixels, and grow of 10pixels, we find out the problem with removing the "equal to" part of the condition.
the diffential is divisible by 10 with no remainder, but when you divide the differential by 20, you will notice the problem. the box can never hit the perfect "equal to" min width (could just as easily be max width depending on your speeds). Depending on the equation the box will too narrow
(if my differential was 150 and my speed was 40, then it would actually stop once the differential got to 160, as 160 is the first time a multiple of 40 causes the condition to return false)
For example:
250px: not less than 100, so minus 40
210px: not less than 100, so minus 40
170px: not less than 100, so minus 40
130px: not less than 100, so minus 40
90px: IS less than 100 so kill the timer... but wait, im less than the min width!

So we put back in the "equal to". But we have the same problem as the first time.
The solution is easy, but tough to spot if your new to code or scripting languages. Before you call the "object.KillTimer 100" and "object.KillTimer 200" you should explicitly set the dimensions to equal max and min widths... like so
Else
object.width = MinW
desktopx.Object("transparentback").width = object.width-rightOffset
object.KillTimer 100
End If


Also, i would recommend setting up variables at the top of your script for speed and rightOffset . This way you dont have to affect the script in three places if you want to change "= object.width-30"
you can just have "= object.width-rightOffset" every time. And you also only have to change the speed in one place.

I hope this helps anyone else that may have been dealing with precise numbers and could not spot where the jump was occuring. Its a concept that can work for more than just movement. any time you have a loop (such as a fade) can benefit from this.


Posted via WinCustomize Browser/Stardock Central
on Sep 29, 2006
alright, thanks a lot for the tut, just a few more things i need to figure out as a complete novice.

if i wanted to make a button that you can push to toggle it being all the way open / close (such as the title) whats the best way to incorporate that into your scripting

and is there anything you need to do to be able to drag shortcuts on to these menu areas? sorry if that's a bad question for some reason, but they're layer types and i clicked 'accept drag and drop' so i assumed that's what it meant.. and if so, how will i go about making it so they'll go in and out with the menu like the areas? or is there any reason to do things differently, should i just put them in the same way the areas were?

thanks
on Sep 29, 2006
thegodbomb,

1. as for a button you would need to change the "mouse over/out" to onclick type events (im not on my normal laptop so i cant give you the exact code). Download one of the thousand other DX widget that are here and find one with a button, and look at the code.
2. drag/drop can be done a lot of ways, look at http://romanda.wincustomize.com/ViewSkin.aspx?SkinID=866&LibID=34&comments=1 for how one way was done.
or look at some of the other themes here and see how they are done.

DX is a great program since you can find something someone has done and just RIGHT CLICK it and see the code, its a great way to learn.

good luck.
on Oct 03, 2006
yes, but what am I trying to do with the event of the button. Should I set the main background's width larger? is there a system in this code for making a simple variable for on or off i can check for in the grow / shrink codes? I just haven't had a chance to really look into the code, but making these work is pretty much all i intend to do for now.

i'll look into the drag and drop, but that's not even too important for how i'll have it set up

thanks
2 Pages1 2