RomanDA's DekstopX Tutorials:
My goal is to make a set of tutorials for DekstopX. If you have ideas on what you would like to see, please email me at DXTutorials@RomanDA.org
Time/Date & more - PART 2:
I continue the Time/Date widget here, if you have not seen part one, please read it first..
This is not my typical tutorial, this will be a STEP-BY-STEP Creation of a widget, not just some code.
DOWNLOAD THE ZIP FILE FOR THIS TUTORIAL FIRST!
DekstopX can use JavaScript or VBScript as its language, I am a LOT more familiar with VBScript then JS so that is what I use.
As always, I'm sure there are other, if not better ways to do this, but this is my way.
|
The Script: |
| |
Right click on the Base object (somewhere where the TEXT objects are not, like the top green part, or bottom green part), and select Properties
From the General Tab in the BASE-Properties dialog select NEW next to Script.
You will see a dialog like the one below |
| |
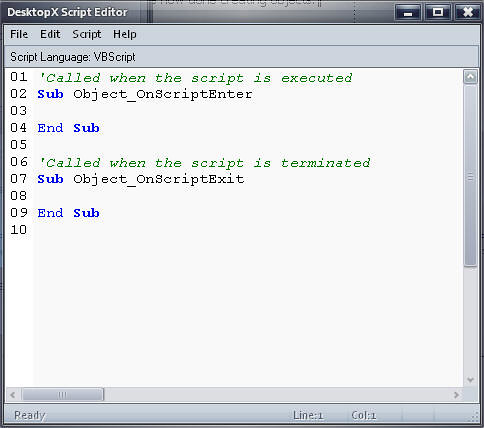 |
This is the DekstopX Script Editor.
From here we will create our script to change the Text objects to show the CORRECT date/time/etc.
We will also setup a "Timer" that will update the time and the date ever 30 seconds. |
| |
We are going to modify the script above to look like this:
(only the text in WHITE is important the YELLOW is to show you what is going on)
| '-- The OnScriptEnter is executed when the object is loaded, so we want to use it to put the initial values in for that text objects, as well as setup a timer to upload these every 30 seconds.
In order to save us from writing the same code multiple times we are going to setup a single Sub that will make the changes to the text objects, then we will call that on startup and in the timer. This way we make changes in 1 place, not 2 or 3.
| Sub Object_OnScriptEnter |
| |
Object.SetTimer 1000, 30000 '-- This turns on a timer called 1000 and runs whats in there every 30,000 milliseconds or 30 seconds
Call setinfo '-- this calls the SUB item below (its just calling another part of the code to do whats in it) |
| End Sub
Sub Object_OnTimer1000 '-- This is the Timer we started above, notice the 1000 is the same as the 1000, in our SetTimer call? |
| |
Call setinfo '-- this calls the SUB item below (its just calling another part of the code to do whats in it) |
| End Sub
Sub setinfo '-- we use this to create a function or sub-routine that is used to do work we don't want to have to code in multiple places. |
| |
'--- DesktopX.Object("objectname").text is used to assign or retrieve the text inside another object.
'--- objectname would be the names we assigned to the objects above: DayOfWeek,Date,Time,MonthName,Year
'--- Sets the TEXT part of the object "DayOfWeek" to the Weekname
'--- now = current date/time
'--- Weekday(now) returns the current day of the week in a # format 0-sunday, 1-monday, etc.
'--- WeekDayName returns the current day of the week in a NAME based on the # for the day:
0=Sunday, 1=Monday, etc. So combining the above will give us the day of the week as a name
desktopx.Object("DayOfWeek").text = WeekDayName(Weekday(now), False)
'--- Month(now) returns the current month as a number 1-12
'--- MonthName converts that to its name.
desktopx.Object("MonthName").text = MonthName(Month(now))
'--- Year(now) returns the current year in 4 digits 2006/2007/etc.
desktopx.Object("Year").text = Year(now)
'--- Day(now) returns the current date 1-31 in the current month.
desktopx.Object("Date").text = Day(now)
'--- FormatDateTime(now,3) returns the complete time in the format: hh:mm:ss am/pm
'--- we only want the hh:mm and am/pm so we need to remove the :ss part.
'--- to do this we assign TimeHold to the long time string.
TimeHold = formatdatetime(now,3)
'--- left pulls the LEFT X characters out of a string
'--- Ex: left("RomanDA",2) would pull out "Ro"
'--- in our case we only want the hh:mm part (but since the hours can be 1-12 it could be multiple digits so we get the current
'--- LENgth of TimeHold ie: 10:12:35 am = 11, we then remove the last 6 characters: :35 am
'--- In order to keep the am/pm we pull the RIGHT 3 characters of TimeHold ( am) the space is 1 character.
'--- all of this leaves us with "10:12 am" removing the seconds, since this script only updates every 30 seconds.
TimeHold = left(TimeHold,len(TimeHold)-6) & right(TimeHold,3)
'-- We now assign the TEXT part of the Time object to TimeHold's text.
desktopx.Object("Time").text = TimeHold |
| End Sub
'Called when the script is terminated
Sub Object_OnScriptExit |
| |
object.KillTimer 1000 '-- Turns off the timer when we close this widget (its good coding to clean up after ourselves) |
| End Sub | |
Click the "File" menu item, then "Save and Close editor", then click "OK" in the properties dialog box.
That's it, it should be working. |
| |
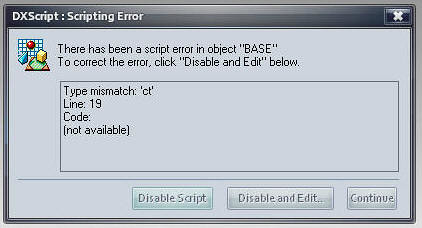 |
If you get a DX Scripting Error box, note the LINE Number its complaining about, and click the "Disable and Edit" button to go back into the script and see what is wrong.
Compare your code to the code above.
Here are some typical problems.
desktopx.Object("DayOfweek").text = WeekDayName(Weekday(now), False)
Tell me what the problem is with this????? anyone???
oh... its the Dayofweek - its not right, it needs to be DayOfWeek (CAP W!)
the CApS are IMPORTANT in DX, if you have an object named DaViD, you cannot call it by David or david, it has to match EXACTLY.
Some other problems are missed spaces, or added spaced. |
| |
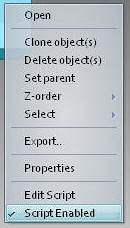 |
if you click on "Disable and Edit" your script is now turned OFF.
To turn if back on RIGHT click (in the green) on the BASE object and select "SCRIPT ENABLE" (see the checkmark that tells you its running, no check, not running).
And see if you get any more errors. |
|
Widget/Gadget Export: |
| |
The last step in the process is to create a WIDGET from the above items. (a widget takes the objects and makes them into an EXE file that requires DX to run).
If you have DX Pro you could make this into a GADGET (a gadget does the same creation of an EXE file, but this one does NOT require DX to run). |
| |
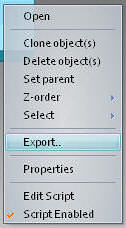 |
Right click on the BASE object and select "EXPORT".
|
| |
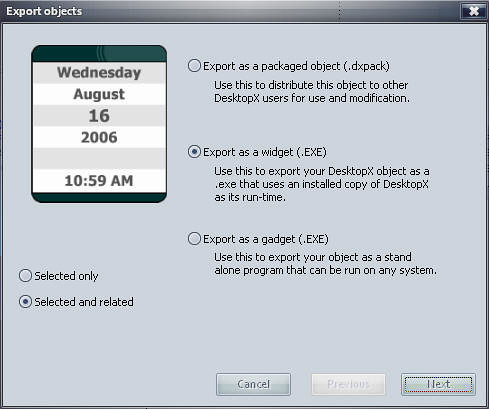 |
In the Export Objects Dialog note the following items:
(x) Selected and related, this will take every object that is has the SAME "widget" name as the one you selected.
This is good if some items are not visible or if they might be off the screen. The other way to select the objects is from the RIGHT CLICK on the DX Icon in the system tray and select "LIST OBJECTS", from there you can "Highlight" all the objects and export them together.
Export as a Widget: Select this if you want to export this as a widget that uses DX to run
Export as a Gadget (PRO Version Only): Select this if you want to export this as a stand alone gadget.
Select "NEXT" |
| |
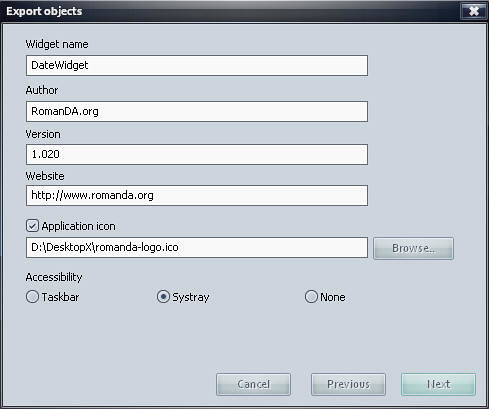 |
Widget name: the name you want to call the widget, I picked "DateWidget" you could call it whatever you want.
Author: Duh - your name
Version: 1.xxx? Whatever you want, I usually start at 1.000 and every time I export it I add .001 to it.
Website: your website
[x] Application Icon: (ico file location). If you made an icon for this widget you can select one, if not use mine!! heheh
( ) Taskbar / Systray / None
Pick where you want this program to show up, most people use the systray so you can right-click it and close it from there, I have never used the Taskbar, as its not designed to be a program like word, or IE, or whatever, its a widget/gadget. But its your call.
None means it will not have an icon, this is risky (no way to right-click and close it)
Select "Next" |
| |
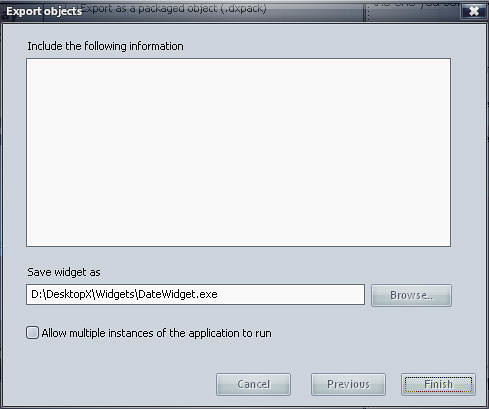 |
Include...: You can include information about you or your widget here, functions, etc.
It shows up in the about/more info dialog when the widget is running.
Save Widget As: Where do you want the widget to be saved and what do you want it to be called. As you can see I keep all my widgets on my D drive under DekstopX/widgets, its your call here.
Allow Multiple ...: This would allow you to run multiple copies of this widget, not something I have messed with, I would assume this is more for something like martin's notepad, but I'm not 100% sure.
Select "Finish" |
| |
|
|
That should about do it. You have now made a new widget that can be run on any machine with DX. I hope this has helped you to get into DXing. It is a simple application of how DX works, and showed you how to create an object from an image, as well as text based objects. It also should give you some insight into how to create a basic script and a timer.
PLEASE let me know if you run into trouble on this, or if it worked and you were able to make this widget do its thing.
I assume no comments means no one is finding these useful. If this is the case, I can stop a lot easier then I can continue. This one tutorial alone has taken me around 3 hrs to type up and setup.