RomanDA's DesktopX Tutorials:
My goal is to make a set
of tutorials for DesktopX. If you have ideas on what you would like to
see, please email me at
DXTutorials@RomanDA.org
DesktopX Object
Resizer:
Lets try this one again...
Resizing an object in DX "should" be easy but it always seems to take a lot more
effort then it should.
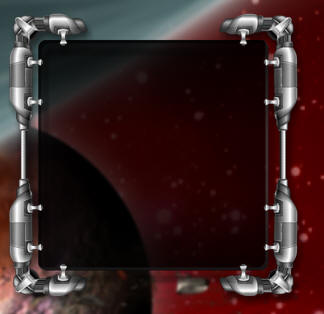
This is the
"Background item" in this case its called:
GalCivII-MenuBar-Graphics-Back
|
|
This will
resize when you drag this "resizer" object. -> |
 |
| |
|
We will use the resizer to
drag around and make the master object resize.
This is the only way i have found to make an object resize.
The resizer object sites
on-top of the master item.
The trick here is to cut part of the master object out and use it for the
resizer.
I pulled a small part of the
bottom right and saved it back out as "resizer".
When you drag the resizer, it
changes its x/y position.
As long as you know the position of the resizer in relation to the master
object,
the rest of this will work pretty well.
In this case the resizer sits 39 pixels from the bot and 35 pixels from the
right. ---NOTE ---
Do not put both of these objects into the same GROUP it will not work! |
 |
The
Resizer object has its "Parent/Owner" set to:
GalCivII-MenuBar-Graphics-Back
It is NOT set as
a CHILD object, that will not work.
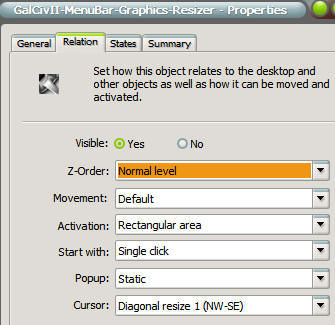
To make it show
the "resize arrows" you have to
make changes to the Relation as you see in this image.
Check the "Cursor" settings.
|
|
Lets look at the
script. |
| |
This is ALL inside the "resizer" there is nothing in the master obj. First lets assign some vars so we
can make this work easier on other object.
|
Dim Min_width, Min_height, ObTop, ObLeft, masterobj
MasterObj = "GalCivII-MenuBar-Graphics-Back"
'- Name of the master object
Min_width = 300
'Minimum width of the master object)
Min_height = 300
'Minimum height of the master object)
ObTop = 39
'Offset from Bottom for Resizer
ObLeft = 35
'Offset from Right for Resizer |
This part moves the resizer (it was
easier to make it a sub so I could just CALL it when I needed it)
Sub MoveMe
object.left = desktopx.Object(MasterObj).width - ObLeft
object.top = desktopx.Object(MasterObj).height - ObTop
End Sub |
This is called when the object is
drawn so it puts it in the right place every time.
Sub Object_OnScriptEnter
Call MoveMe
End Sub |
This is the resizing, it uses "OnDrag"
to reposition the resizer object, then make the master object change
width/height.
Sub
Object_OnDrag(x,y,newX,newY)
newh = newY + ObTop
'Take the
newY plus the top offset to get the width
neww = newX + ObLeft
'Take the
newX plus the left offset to get the height
If neww > Min_width Then
'if the new
size is greater than the min width then resize it (or stop it at the min
size)
DesktopX.Object(MasterObj).width = neww
Else
DesktopX.Object(MasterObj).width = Min_width
End If
If newh > Min_height Then
'if the new
size is greater than the min height then resize it (or stop it at the min
size)
DesktopX.Object(MasterObj).height = newh
Else
DesktopX.Object(MasterObj).height = Min_height
End If
Call MoveMe
'move the
resizer so its always in the right spot
End Sub |
The next step would be to "hide"
the inside objects and then unhide them after the resize was done. (might update
this if i get a min).
CLICK
HERE to download the working version of this and see how it works.