
 |
| Step-by-Step Tutorials |
#11 -
Animation
|
|
A series
by RomanDA
|
Listing of other DX Tutorials:
Click here
Today's Lesson: "Animation"
Ok, So.. I lied. Well I
didn't Lie, I really was done, but this one was really simple and I saw some
people asking about this, and I had just finished making just this thing.
I figured why not.
So call it a bonus for me becoming a Master.. or call it, I was bored.
We will be Using the SCRIPTED
Animation check you have seen in the Object "Animation" tab.
For this and all the Step-By-Step
DX Tutorials you will need to purchase
DesktopX
for $14.95 from Stardock.
Lets get started.
STEP
1 - Create the objects
We are going to make a single
object here, but its more complicated then normal.
First thing you have to do is
make a PNG that has multiple images inside it. There are a LOT of ways to
make this kind of PNG.
I have used FLASH to export a
series of images, then they all need to be complied into one image.
Like this:

The trick with the frames
(objects) in this kind of image is that the need to be EXACTLY The same size,
and they have to be spaced EXACTLY the same as well.
In this case the image has 4 frames, I numbered them for you so you will be able
to see the animation in action.
Create a NEW object, call it
"TEST" or whatever.
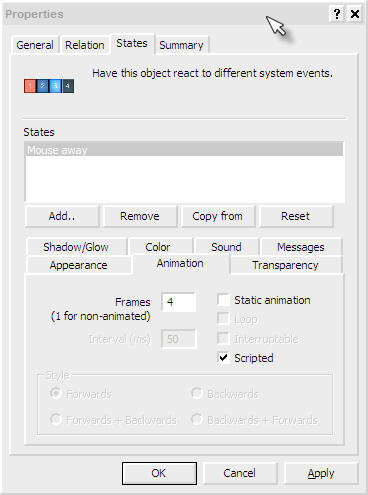
You can (save-as) the above image, and use it for testing. The Catch here
is make sure you change the ANIMATION TAB in the STATES tab of the properties to
show:
(4) Frames, and SCRIPTED is
checked.
STEP
2 - Moving Ahead - Add a Script
Create a SCRIPT on the object we
just created.
|
ANIMATION Code |
| |
Function Object_OnLButtonUp(x, y, Dragged)


  If Dragged = False Then


  	CurFrame = object.CurrentFrame + 1


  	If CurFrame < 4  Then


  		object.CurrentFrame = CurFrame


  	Else


  		object.CurrentFrame = 0


  	End If


  End If

End Function |
Lets look at the above script.
First we use the same function we use all the time to handle click:
|
ANIMATION Code |
| |
Function Object_OnLButtonUp(x, y, Dragged)


If Dragged = False Then |
Here is the main part of the
script. The script looks at the object to see what its Current Frame is.
CurFrame = object.CurrentFrame + 1
This is based on 0-3 not 1-4, even though there are 4 frames in the
animation. We START at 0 not 1!!!!
Then we check to see if CurFrame
its less than < the max number of frames (4 frames of animation).
If so, then we make the current frame the new CurFrame.
Or else the object's CurrentFrame
is set to 0 (the first frame of the animation).
|
ANIMATION Code |
| |
  	CurFrame = object.CurrentFrame + 1


  	If CurFrame < 4  Then


  		object.CurrentFrame = CurFrame


  	Else


  		object.CurrentFrame = 0


End If |
CONCLUSION
So, that's about it. you
click on the object, and it changes the current frame up 1 each time till it
gets to the last frame, then it goes back to 0.
I used this in something I'm working on right now.
I hope you took the time
to enter the code (not just copy/pasted the entire thing) so you could work thru
the tutorial step-by-step and see how things work.
This one was very simple, but I
know I didn't know how to use this till I had to, so I hope it helps everyone
out.
This REALLY will be my last
tutorial for a while. I hope you have enjoyed this step into DX.