 |
| Step-by-Step Tutorials |
#10 - Hide
& Seek
|
|
A series
by RomanDA
|
Listing of other DX Tutorials:
Click here
Today's Lesson: "Hide & Seek"
This will be the last in this series
of Tutorials. I hope you have enjoyed them, and managed to get something out of
them.
In this lesson we will do some basic DX operations on one object from another.
We will cover the following:
- HIDE/SHOW one object by clicking
on another
- SLIDE/HIDE one object by clicking
on another
- EXPAND/SHRINK one object by
clicking on another
For this and all the Step-By-Step
DX Tutorials you will need to purchase
DesktopX
for $14.95 from Stardock.
Lets get started.
STEP
1 - Create the objects
For this tutorial we will be using
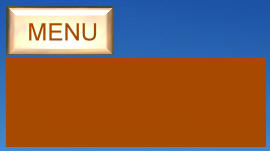
3 objects: (right click and SAVE the images to your pc)
- Create 3 objects. (look at the
old tutorials for info on how to do this)
- Create an object called Mask
- width: 260
- height: 90
- Group Tutorial10
- Widget Tutorial10
- NOTE: we will later change
the transparency to 0, but for now we want to see how the mask makes things
work.
- Create an object called Target
- Make its PARENT object
MASK
- place it at 0,0 for
top/left.
- Group Tutorial10
- Widget Tutorial10
- Create an object called Button
- place it above the TARGET/MASK
object (like you see in the table above, just above it)
- Widget Tutorial10
- NO GROUP!!!!
- We will make a VERY simple script
on Button to hide/show Target.
STEP
2 - Add a simple HIDE/SHOW Script
Add the following script to Button:
|
BUTTON Code |
| |
Function Object_OnLButtonUp(x, y, Dragged)

  If Dragged = False Then

    If desktopx.Object("Target").visible = True Then

      desktopx.Object("Target").visible = False

    Else

      desktopx.Object("Target").visible = True

    End If

  End If

End Function |
Lets look at the above script.
Its VERY simple, we look at the Visibility of Target and see if its True
(is it visible), if so, we HIDE it (False), if its Hidden (False) we Show it (True).
|
BUTTON Code |
| |
If desktopx.Object("Target").visible = True Then 'is Target Visible?

		  desktopx.Object("Target").visible = False 'If so, HIDE it

		Else

  desktopx.Object("Target").visible = True  'If not, SHOW it

End If |
That's all there is to it.
SAVE the code.
Click Button to see how it toggles Target on/off.
The MASK will stay there, but that's ok for now, we will play with that NEXT.
Here is what you will see:
| Normal
View |
CLICKED |
 |
 |
STEP
3 - Sliding Target
Now, lets change things up.
Lets make the TARGET SLIDE up into the menu. We do this by making a
script that has a few Timers (in order to slow up the sliding).
The script is a modified version of my script I used in another tutorial.
The basics are this.
- The
Function Object_OnLButtonUp(x,
	y, Dragged)
is the button
being pressed (well released)
Inside here we look at the TOP position of the TARGET.
If the TARGET's top is = 0 this means its being shown and is at the normal
position, so we want to HIDE it (Timer 200).
If not then we want to SHOW it (Timer 100).
We kill the timer just to be sure, then we set the correct timer to start.
- In the timers we simply look
to see if the top is at 0 or at -90 (shown / hidden).
All we do to HIDE the TARGET is to move it 5 spaces at a time UP
- Because we have the TARGET's
parent as a MASK it will move up past the Visible area the mask shows, so it
will look like its vanishing.
- In the Timer we keep moving
it UP until it reaches -90 (the object it 88 pixels tall), then we kill the
timer.
- When we click the button again
it sees the TARGET.top position is -90 and it SHOWS it by doing the opposite
as it does to SHOW it.
- We move it DOWN 5 pixels at
a time till its back to 0, with the mask setup it looks like its sliding from
nowhere.
- We are using this
Sub Object_OnScriptEnter

  desktopx.Object("Target").top = 0

	End Sub
To set the initial TARGET
position to 0, just so that it shows the menu on startup. If you wanted
to have the menu HIDDEN on startup, you would change the 0 to -90
Here is the script to SLIDE the TARGET UP/DOWN: (this code goes in the
BUTTON)
REPLACE the code from the "HIDE/SHOW" above.
|
BUTTON Code |
| |
Sub Object_OnScriptEnter

  desktopx.Object("Target").top = 0

		End Sub


		Function Object_OnLButtonUp(x, y, Dragged)

  If Dragged = False Then

    If desktopx.Object("Target").top = 0 Then

      object.KillTimer 100

      object.SetTimer 200,10

    Else

      object.KillTimer 200

      object.SetTimer 100,10

    End If

  End If

		End Function


		Sub object_ontimer100

  If desktopx.Object("Target").top < 0 Then

    desktopx.Object("Target").top = desktopx.Object("Target").top
		+ 5

  Else

    object.KillTimer 100

  End If

		End Sub


		Sub object_ontimer200

  If desktopx.Object("Target").top > -90 Then

    desktopx.Object("Target").top = desktopx.Object("Target").top
		- 5

  Else

    object.KillTimer 200

  End If

End Sub |
This would end up looking like this
(when you click the button it goes UP then DOWN):

To make this look a LOT better you
could go in and make the MASK's transparency = 0 so that its basically invisible.
You can use whatever objects you want, you would only have to change the -90 to
the correct height for the object you want to use.
Again, these are just samples for you to work with.
STEP
3 - Shrinking / Expanding
Ok, so we know how to HIDE/SHOW
by clicking the button, and we can make it SLIDE UP and DOWN too. Now lets
make the TARGET EXPAND / SHRINK.
To do this we will use some of the same functions as above. Only now we want
to not MOVE the TOP, we want to change the WIDTH of the TARGET.
The targets "default" size is: 255x88 What we want it to do is shrink down
to 30x88 (so that it EXPANDS out from the left to the right).
One of the things we need to do is
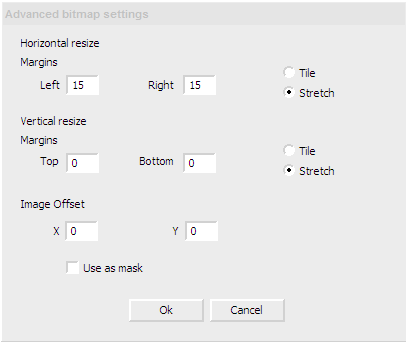
change the ADVANCED settings on the TARGET image.
Click on properties, then States then ADVANCED:

This will make it so the 3d EDGE
of the TARGET stays the right width, and the insides kind of Expand.
|
BUTTON Code |
| |
Sub Object_OnScriptEnter

  desktopx.Object("Target").top = 0

  desktopx.Object("Target").width = 25

		End Sub


		Function Object_OnLButtonUp(x, y, Dragged)

  If Dragged = False Then

    If desktopx.Object("Target").width = 25 Then

      object.KillTimer 100

      object.SetTimer 200,10

    Else

      object.KillTimer 200

      object.SetTimer 100,10

    End If

  End If

		End Function


		Sub object_ontimer100

  If desktopx.Object("Target").width > 25 Then

    desktopx.Object("Target").width = desktopx.Object("Target").width
		- 5

  Else

    object.KillTimer 100

  End If

		End Sub


		Sub object_ontimer200

  If desktopx.Object("Target").width < 255 Then

    desktopx.Object("Target").width = desktopx.Object("Target").width
		+ 5

  Else

    object.KillTimer 200

  End If

End Sub |
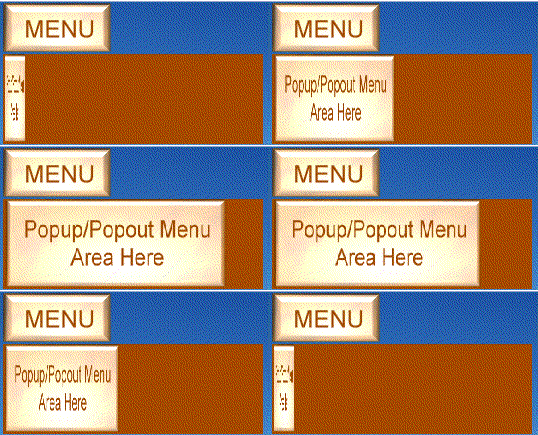
This would end up looking like this
(when you click the button it EXPANDS / SHRINKS):
It wont look exactly like this, the edges should stay and the middle should shrink
(I just dumped this into flash, so its not the same).

In the case of the EXPAND/SHRINK,
you do NOT need the MASK, so you could delete that object. I left it here
only for reference.
CONCLUSION
I hope you took the time
to enter the code (not just copy/pasted the entire thing) so you could work thru
the tutorial step-by-step and see how things work.
This tutorial is actually 3 in 1.
But they are related, so I wanted to make this last Tutorial a good one.
This will be my last tutorial for
a while. I hope you have enjoyed this step into DX.